Video tag user to Apple: Get your act together.

I’m currently trying to get a video of the last demo online and all things considered, it has been a good experience… except for Apple’s Safari browser. It’s nice that they support the video tag, but their implementation is pretty much useless:

  • Don’t say that you support a feature when you really don’t.

    Apple’s implementation lacks support for the controls attribute, which tells the browser to display a native interface for video playback. I don’t really have a problem with this, but why the heck does Safari tell me that it does support it?

    The controls attribute is treated as if it was supported with the controls property mirroring the value of the controls attribute. So myVideoElement.controls is true or false instead of the undefined I’d expect for an unknown attribute.

    In the end, that means that I have to do browser sniffing to load my own interface for Safari and I thought that we had all agreed by now that this is a bad thing

  • Don’t say that you support h.264 when you really only support is your own special flavour.

    There’s a lot discussion going on over which codec to use for video, but something that’s often overlooked is that Apple’s h.264 decoder is a proprietary mess that will only accept Quicktime created MP4s. Since video in Safari uses the Quicktime backend that means that you won’t be able to actually use h.264 unless you fork some cash over to Apple for Quicktime Pro, even when there are many better and cheaper alternatives. This is exactly the lock-in that shouldn’t happen with video.

    The only real alternative for now is using the MPEG-4 Advanced Simple Profile (better known as DivX or XviD) and suddenly all the better quality you were promised in exchange for having to use a proprietary format is gone.

Fake Voxels with filters

Click the image above to get to the demo

Video

Download/View in external player

Voxels are a way to display 3D data that dates back to the days before 3D accelerators became popular. Voxels (VOLume piXELS) don’t store models as triangles or polygons, but instead
function much like a traditional bitmap, only these bitmaps have 3 dimensions, much like a video (where the third dimension is time). Today you find them mostly in medical scanners.

This demo however doesn’t use real voxel data (we get to the rendering in a second, this is just about the data itself), but a variant where there is only a two dimensional bitmap and a third channel
that contains the Z position of the pixel. The benefit is that there’s a lot less data, but there can only be one color for each pixel at all depths, which makes it well suited for terrains, but not so
much for anything else. This is the way most games used voxels and it even has found its way into modern games as "parallax mapping" for textures, which is really just voxel rendering
implemented as a shader.

The rendering itself isn’t real voxel rendering either. That would require a 3D buffer that’s currently not available to filters. Instead, a series of perspective renderings is just put
on top of each other, so these voxels don’t have any side surfaces, just the top. At steep angles this would pose a problem, but since we’re looking at it from (roughly) a 45 degree
angle, it works well enough.

Code-wise this is really just a simple evolution of the MarioKart demo and if you
want to know how the perspective rendering is done you should look there.

The only real difference is that this uses 5 different perspective renderings, stacked upon each other. Then there’s a bit of fairly simple brightness/contrast adjustments: The bottom layers
are made a little darker and the alpha channel gets higher contrast and a brightness adjustments depending on its height. The top ones are made to display only where the alpha
channel is entirely opaque/very bright, while the bottom ones pretty much ignore the alpha channel.

Frankly, I didn’t expect this to work, primarily because the filter is very, very long. It needs to process around 30 operations to generate each frame (4 operations for each of the 5 layers + 5 for the texture + 3 for the texture transformation)
, and that’s with a 768×512 surface. It’s not very difficult to understand, but there’s simply a lot of processing needed and the speed at which Firefox renders this is nothing short of amazing.

Font work: schmucker-sans-nothrills-rev0

Click to get to the SVG.

When font-face made it’s appearance in all major browsers I was really, really excited. Until I learned that I wouldn’t be able to use any commercial fonts and even most free fonts. So I’ve started working on my own. It’s terribly basic and isn’t even complete yet, but I thought that maybe some people could even have use for an incomplete font. It is currently available as an SVG containing the letters A-Z, a-z and the numbers 0-9.

schmucker-sans-nothrills-rev0 is built from first principles: Lay out a grid for your letters, create one arc for the round parts and try to assemble all letters from these parts. It’s not exciting, but it should be easily readable so you can also use it for longer text paragraphs, not just headlines.

The most interesting thing is probably the license, which allows for pretty much anything. I’m putting this into the public domain.

So, create fonts or use it in your logos or basically do whatever you like. Would be nice if you sent me a mail though.

Dynamically textured animations in the browser

It’s probably best to let you play with this little demo first. The animation is stored only once and the texture is applied dynamically. Keep in mind that this is only a techdemo. Somebody more familiar with animation could use this technique for something truely great (think along the lines of you uploading an image of yourself and suddenly you’re appearing in a movie, thanks to the combined power of the video tag and this).

The technology is not the limiting factor here, just my artistic skills.

The concept

.. .is actually pretty simple. An animation is rendered with a placeholder, instead of a real texture. This placeholder contains the position in the texture (encoded as color). Specifically, the model was rendered with this texture, using a planar projection for UV coordinates.

When the animation is shown, the pixels get replaced again with pixels from some texture that the user or the developer specifies.

All this can be done with SVG filters, specifically feDisplacementMap. If you want to know in detail how it’s done, have a look here. The only real difference here is that instead of a static map, a series of images is composed into an animation.
You may also want to look at the source of the demo. Everything needed to recreate the effect shown here is marked with the keyword IMPORTANT.

Can only Firefox 3.5 do this? And why aren’t you using the video tag?

Most modern browsers can do this, but there are a few differences that you should be aware of: To make this work, your video has to be stored in a lossless format.

For Gecko based browsers that’s usually APNG in an IMG or maybe at a later time Theora (the current encoders don’t allow for for lossless YUV compression, but that’s likely a limitation of the current tools, not the format, as we’ve seen with JPEG or h.264) via VIDEO. For Webkit it’s lossless h.264 and for legacy browsers it may be a greyscale GIF containing the color channels side by side, so they can be recombined by the filter.

Older browsers also need the filter applied inside an SVG document, so you’ll have to load an SVG in an iframe to do the rendering.

To sum it up: This demo only works in Firefox 3.5 because I didn’t want to spend more time optimizing it. I wanted to show you what can be done and Firefox 3.5 made it easiest for me. But you can make it work. For a few pointers, see this file, which implements a similar solution in pure SVG.

Smooth image filtering for MSIE6+ and Firefox 2+

Sometimes working on a production website reminds you of problems you thought that were long gone. In this case, I needed smooth image scaling for the majority of browsers and yes, that sadly still includes MSIE6 and Firefox2.

The solution for MSIE6 is pretty well known, so I’ll keep this short: You need to apply the AlphaImageLoader with sizingMethod scale:

<img src="blank.gif"
   style="
      filter:
         progid:DXImageTransform.Microsoft.AlphaImageLoader(
            src='myImage.jpg',
            sizingMethod='scale'
      );
   "
/>

Firefox2 is actually more difficult here. There are no hidden properties or anything that will magically render your image smoothly. But there’s another way to do it. Namely, the SVG renderer, which uses smooth image rendering by default. So you simply need to link in an SVG via the object tag instead of the image:

<?xml?>
<svg
  xmlns="http://www.w3.org/2000/svg"
  xmlns:xlink="http://www.w3.org/1999/xlink"
>
   <image xlink:href="myImage.jpg"
     width="100%" height="100%"
     preserveAspectRatio="none"
   />
</svg>

If you want to automate the whole thing, the easiest way is using data urls, because it means that you don’t have to create separate documents. Instead you just let a script run over the page and replace the imgs with objects. The only real difference with data urls is that you have to urlencode the characters, which makes the final object tag something like this (without any linebreaks):

<object data="data:image/svg+xml,%3C?xml%20?%3E%3Csvg%20
xmlns=%22http://www.w3.org/2000/svg%22%20
xmlns:xlink=%22http://www.w3.org/1999/xlink%22%3E
%3Cimage%20xlink:href=%22test.jpg%22%20
width=%22100%25%22%20height=%22100%25%22
%20preserveAspectRatio=%22none%22%20/%3E
%3C/svg%3E" type="image/svg+xml" />

That’s pretty much it. Now I’m off to investigate Safari and Opera.

Perspective texture with 6 lines of SVG

SVG filters in HTML

In modern browsers there’s lots of functionality that’s rarely used, because it’s either hard to understand and/or hard to use. One such thing is SVG, and especially filters. For use on the web they were too unreliable in the past and most importantly, they required you to use SVG (although you could link your original HTML back in through use of foreignObject). Well, no more.

With Firefox 3.5 we get stable filters support (at least nothing’s missing that I wanted to use) and we can now use them in our HTML through CSS.

But there’s still a problem with the documentation. Try to type a filter name into Google, like “feDisplacementMap” and you get not even 3000 results. And two thirds of those are either bug reports for engines implementing them or pages trying to sum up the spec. The spec itself is also often hard to understand and in desperate need of some clarification and more complex examples.

So I’m going to do my share about it and explain a bit about the before mentioned feDisplacementMap and how to use it to do cool stuff.

Let’s look at the cool demo first

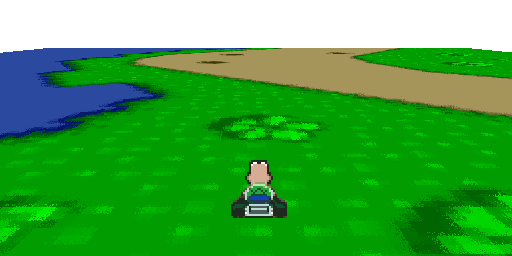
If you just came here because somebody who linked here mentioned Mario Kart, I think I should have the decency to give you a link to the demo straight away. Go here. But be aware that this is not actually a game, just a demo showing what you can do with feDisplacementMap. There’s no colission detection, no enemies, no goals.

All the rendering is done through an SVG filter, except the controls and the initial 2D transformation, which is done with Canvas (however you can also do this with pure SVG as well like I did here, it’s just a bit faster with Canvas).

If you want to know how it’s done and how you can use the same technique to do other cool effects, read on.

What’s fedisplacementMap and why should you care?

feDisplacementMap is an SVG filter for pixel mapping. Basically you provide a source image and a map which pixel goes where and that’s it.  And if you have to warp pixels around there’s nothing you can do in a browser that would be faster. It’s also probably the most versatile filter you’ll find in SVG.

What you can do with it

Basically everything where you have to transform different images the same way over and over again. That could be anything, like a lense effect, mirroring, or a perspective deformation.

How it works

The first little thing to look out for is that the displacement filter does not actually allow you to “push” pixels around. If it did that then you’d typically end up with a lot of empty spots because nothing was pushed there and the color that was initially there was pushed away.

Instead, it works the other way around: Each pixel contains information which pixel of the source image it should show. using the distance to the current pixel to specify it. In other words, each pixel of the map contains an instruction like “show the pixel from the source image that’s 12 pixels to the left and 4 pixels up from the current one”, not “move this pixel 12 pixels to the right and 4 pixels down”. It’s a subtle difference, but one you should be aware of.

Turning the raw offsets into a displacement map

This information is encoded into a color in order to save the displacement map as an image. The encoding is actually quite simple. The distance to the source pixels is split into an X distance and a Y distance. That distance is then spread across the color range (0-255) where 0 means a lot (we’ll talk about how much in a second) to the left/up and 255 a lot to the right/down. Then each one is saved to a color channel, for example red for X and green for Y (you can later specify in the filter which channel you used for what).

The actual distance is lateron calculated in the filter by multiplying the color value with a multiplier you specify, so how long the distance to the source pixel actually is depends on what multiplier you use. Set it to 255 and you’ll mostly get what you expect (0 meaning 127 to the left/up and 255 to the right/down).

Things to watch out for

There are mainly two things that can cause you a lot of headaches if you’re not aware of them:

  1. SVG by default uses a strange colorspace that will lead to unexpected results. Why they did that when they wrote SVG I’ll never understand, sufficient to say that you better set the colorspace to sRGB if you want to retain your sanity.
  2. The source image isn’t automatically wrapped, so if your displacement map pulls in a pixel that is outside the source image, it will appear transparent.

The good stuff: absolute mapping

The thing that limits feDisplacementMap most is that it can only use relative offsets. There is no way to say that you want the pixel at 10,12 to appear at a certain point, just the one 3 pixels to the left and 2 pixels up… but with a little trickery you can still do it:

The trick is to tile the source image so that every pixel is in the reach of every target pixel. In other words: resize it to 256×256 and tile it across the size of your destination surface. Then all you have to do is substract the current position from each absolute position you have in your mapping and finally put it into 0-255 range (modulo 256).

Adding filters to your HTML

Applying a filter is really easy in Firefox 3.5. Just add a filter CSS rule to any element, like this:

filter:url(#myFilterId);

Specifying the actual filter is a bit more difficult, but still doable. You can either put it into a separate SVG and link it in with

filter:url(mySvgFilters.svg#myFilterId);

or, if you want to add it inline, you have to include the SVG namespace in your HTML declaration and add a SVG element to your body.You’ll have to put “svg:” in front of the SVG elements to tell the browser that it’s not some unknown HTML element, but a SVG element instead.

<html
 xmlns="http://www.w3.org/1999/xhtml"
 xmlns:svg="http://www.w3.org/2000/svg"
 xmlns:xlink="http://www.w3.org/1999/xlink">
  <body>
    <svg:svg height="0">
    </svg:svg>
  </body>
</html>

Chose whichever way you want, as long as you’ve got the filter inside a SVG element somewhere, you’ll be fine.

Now, for the actual filter. This will add a filter with sane settings.

<svg:filter
 id="myFilterId"
 color-interpolation-filters="sRGB" 
 filterUnits="userSpaceOnUse"
 x="0" y="0" width="768" height="512">
</svg:filter>

That’s an awful lot of strange settings I know, but you’ll get the hang of it:

  • color-interpolation-filters=”sRGB” makes sure that the filter will use normal RGB colors instead of some other strange format.
  • filterUnits=”userSpaceOnUse” tells the filter to use pixels as default unit which usually is a lot easier to understand. You can still use percentages like “100%” but pixels will be the default unit.
  • x=”0″ y=”0″ width=”768″ height=”512″ specify the dimensions. Naturally, this should fit your element’s dimensions. Make sure to not forget the x/y declaration, because otherwise the filter will default to a position of -10%,-10%.
  • id=”myFilterId” I think this is pretty self-explanatory.

Writing a filter

A filter consists of one or more filter operations, which are basically mini-filters that do simple operations like bluring. A filter combines these operations into one big processing chain.

The basic format for a single operation is always like this:

<svg:feSomeOperation in=”someInput” result=”someOutput” x=”0″ y=”0″ width=”256″ height=”256″ />

If an operation takes an input, you can specify an “in” attribute (some operations also need a second input, in which case you also specify an “in2” attribute). If you don’t specify it, the operation will simply use the output from the previous one. There are also some special inputs like SourceGraphic, which contains an image of the element to which the filter was applied.

If you want to reuse the output and not just use it directly afterwards by not specifying an “in” attribute, you have to provide a “result” attribute. Just give it any name and you’ll be able to reuse the output by specifying it as another operation’s “in” attribute.

And lastly you need to specify the rectangle to which the filter is applied.

That’s pretty much it. So let’s look at an actual filter, like the one I used in the Mario Kart demo.

The Perspective Texturing Demo filter

Note that the element that you apply the filter to should be 256 pixels bigger (on each axis) than the output. This is necessary so that the displacement at the very edge can reach “beyond” the souce image.

<svg:feOffset width="256" height="256" />

First we need to crop the image. We only want the top-left 256×256 image. feOffset filters are actually meant to move the image around, but since we didn’t specify any offsets via the “dx”/”dy” attributes, it will just crop the image to the given dimensions.

<svg:feTile width="100%" height="100%"  result="source" />

Now we create an image the size of our element which is filled with the output from our previous cropping operation. The next operation will deal with the actual displacement map, so we’ll have to save the output as “source”.

<svg:feImage x="128" y="128" width="512" height="256"
 xlink:href="fdisplacement512.png" result ="displacement"/>

Then we load the actual displacement map. Since the displacement can go 128 pixels to the top/left and 128 pixels to the right/bottom, this should be 256 pixels smaller than our element and placed at 128,128. That way no displacement will reach outside of the source image.

<svg:feDisplacementMap   x="128" y="128" width="512" height="256"
 color-interpolation-filters="sRGB"  in="source"  in2="displacement"
 scale="255" xChannelSelector="R" yChannelSelector="G"  result ="out" />

This is the actual displacement. Nothing special here, except that we set the scale to 255 to get a mapping where a color difference of 1 actual means a one pixel shift.

<svg:feComposite in2="displacement"  operator="in" />

The composite filter is used to apply the alpha map of the displacement map to the final image.

<svg:feOffset x="0" y="0" width="512" height="256"  dx="-128" dy="-128" />

Since we placed our displacement map at 128,128 we have to move it back to 0,0

How to create the an absolute map with your favourite image editing application

Step one: Creating the neutral image.

The neutral image simply maps each pixel to the same one in the source image. It’s want you always start with and it never changes.

You can simply use this image, but if you want to create it yourself (which is a good idea if your image editor supports more than 8bit per channel, since you can use dithering to create a bilinear-filtering like effect), here’s how to do it.

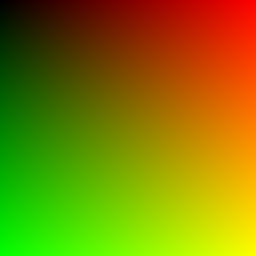
Just fire up your favorite photo editor and create two grayscale images with the dimensions that you want the output to be: Fill both with a gradient from black to white. One vertically, one horizontally. Also create a solid black image with the same dimensions.

Then combine them into one color image with each grayscale image being one color. For example you could make the horizontal one red and the vertical one green. If you now check the colors and positions in the image they should match. The pixel at x:10%,y:20% should have the color red:10%,green:20%,blue:0%.

Step two: Deforming the image.

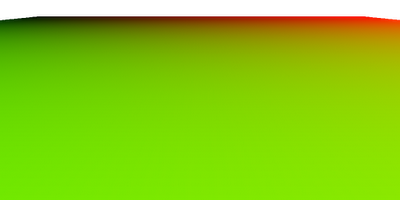
You can use any deformation filter you want. Obviously, for the demo I used the perspective deformation tool, but you can use anything that doesn’t alter the color of the image, like lens, wave, barrel deformations.

Step three: Changing the absolute source values to relative values.

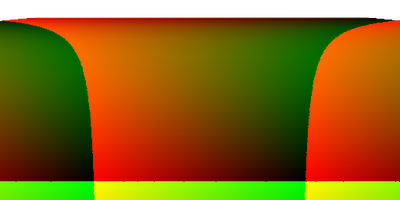
That one is a little more complicated. Since feDisplacementMap doesn’t really allow you to map a source pixel directly to a target pixel we have to subtract the position of the pixel to convert the absolute position we have so far into a relative position. So basically, you have to load the image we created into something that can run a bit of code on each pixel and run something like the following code on each (you can just save this script and exchange the source image path for yours):

offsetInRgbaArray=(currentY*width+currentX)*4;
absoluteSourceX=mapImage[offsetInRgbaArray+0];
absoluteSourceY=mapImage[offsetInRgbaArray+1];
sourceAlpha=mapImage[offsetInRgbaArray+3];

if(sourceAlpha>254){
  mapImage[offsetInRgbaArray+0]=(absoluteSourceX-currentX+16384)%256;
  mapImage[offsetInRgbaArray+1]=(absoluteSourceY-currentY+16384)%256;
  mapImage[offsetInRgbaArray+2]=0; mapImage[offsetInRgbaArray+3]=255;
}

And that’s it. Try every transformation you can think of, like a lens deformation to create a globe that you can travel.

Making use of Video tag and Canvas

There’s a lot of great stuff in the (X)HTML5 spec, but the greates thing is how these additions work together. For example, the video element may not seem terribly exciting at first.

YAVE – Yet Another Video Embedder, so to speak. But once you scroll a few pages down to the Canvas element and fully grasp what the following two sentences actually mean, you can’t help but marvel at its magnificence:

“To draw images onto the canvas, the drawImage method can be used. […] The image argument must be an instance of an HTMLImageElement, HTMLCanvasElement, or HTMLVideoElement.”

What this means is that videos are for the first time in a browser fully scriptable. Just draw it to a canvas and you can read it, pixel by pixel. For example, you can have a song include volume and frequency information in the video track, then use Javascript to build great visualizations (this only works in recent Firefox 3.5 beta builds for now) from it.
Or you could prepare a depth map so that it appears threedimensional when viewed through anaglyph glasses. Or feed it into a real 3D engine and view it from all sides.

Sure, there’s lots more to do until web applications will have the same power available as desktop ones, but with video and canvas working together we are making major progress towards web browsers not just showing media content, but actually being able to process it.

Right now, the web is a great place to be 🙂

Google Chrome? Good for some people, not good enough for me.

UPDATE:
A few people have since pointed out that there are developer tools available in the “page” menu. Sorry, it wasn’t obvious to me. So cross out the points below concerning the absence of such tools.

Concerning Google Chrome,

Right now, Blogs all over the world are reporting about the great new browser Google has and I too decided to take a look. After all, it’s Google we’re talking about here, so it has to be good.

And it is, kinda. Google is trying to create a browser for the “casual” crowd. People who spend less than an hour a day using the internet, people who don’t have a lot of tabs open and who freak out when a program crashes. People who don’t have friends who can help them set up their computer and are therefore stuck with Microsoft’s slow and buggy Internet Explorer. And for that purpose, Chrome is actually quite good.

Let’s start with the installation. Run, say whether you want to import your Internet Explorer favorites (it didn’t even give me an option to import my Firefox bookmarks). Done. It’s really that simple and straightforward. Of course I’d like to have more options, but I’m not really the one Google is trying to win over, so that’s OK.

Then it starts. And my first thoughts are “Man, this is ugly”. Where other browsers try to look like native applications, Google has chosen the opposite route. The buttons on the top look a bit like Vista’s, but that’s about it (besides, I’m not using Vista, so it would be the wrong OS anyway). Everything else is in a Google typical gray/blue theme that looks more like a webpage than an application. The fact that it integrates poorly with the OS alone is almost a dealbreaker for me, but once again, it might actually appeal to people who do little enough with their PC that they value glamour over consistency. However, it seems like usability was not really that interesting to the Google folks either: The grey/light blue color combination provides little contrast and my first few clicks where actually attempts to click on the nearly invisible scrollbar.

Next step. The welcome page has opened and greats me with what to expect the next time I come here (a list of most used pages). I already know that, but decide to take a look at the help anyway, which turns out to be a little page with a few UI tips. Sadly, the navigation breaks and pressing “back” doesn’t work as expected as it only changes the title of the page to “Untitled”. I have to admit, I expected a bit more polish here and while it isn’t really a dramatic bug, it’s not a good thing to present the user with it on his first launch.

The basic browsing functions work fine, after all WebKit has been used a few times before and by now is pretty good. The Javascript engine also is almost as fast as promised and generally does a good job. Nothing to complain about here.

So I decide to take a look at the taskmanager to see how Google’s idea to seperate the tabs into individual processes has worked out. Not to well for me as it turns out. Chrome is using 267MB of memory right now, while Firefox with the same pages open uses 186MB. Again, Chrome turned out to be very bad for my habits… I can’t even see any of my tab’s titles anymore, because there’s no tabbar scrolling. But would your typical “casual” surfer open 30+ tabs at once? Probably not. Again, a major issue for me turned out to be just fine for the target audience.

And so it goes on and on. No addons, no error console, no developer tools, nothing that a casual user won’t miss. And that’s really all there is to it. If you want just a simple browser, then this is fine.

The only question that remains for me: Why then not use Safari itself, instead of Google’s version?

Oh and one last thing. Whoever wrote that comic didn’t do Google a favour. Because to me, this “that’s how we do it and that’s the only right way to do it” talking sounds just terrible. Mockery doesn’t really inspire sympathy and when a friend asks me “which browser should I install?” it might be this bit that keeps me from saying “Try Google Chrome”.